Showing posts with label decorate. Show all posts

Friday, December 28, 2012

My Bestie's Baby Girl Shower


In October my girlfriends and I threw a shower to honor our best friend, Victoria.
After a few Pinterest-comparing sessions we came up with the pink and brown theme to match her nursery.  She had also picked out her baby's name and wanted to reveal it at the shower, so we had the awesome task of figuring out fun ways to reveal the name.

Shower must-have #1: Tissue poms in light and bright pink colors. Here's a link to a super-easy tutorial.  You can tell from my pic that I opted for the rounded petal-y ends on these poms. Um, and how presh is that blog? Read it, then come back to me. Because I love you.

One of my co-hosts, Jessica, has an uber-talented mom who made this beautiful diaper bouquet.  She stuffed the vase with rolled baby wash cloths and the pink tulle amongst the little diaper tulips makes it so soft and pretty.  At the bottom is the handmade photo album with adorable, melt your heart quotes and detailing. All the mom-to-be has to do is stick in her baby's pics and add birth details. So beautiful!  One day she'll open an Etsy shop and I'll spread the word. Until then, I don't know how she does it. It's a true talent and such beautiful gift to share!

Okay, so I've left you hanging on how we did the name reveal. We got pink deco mesh and used ribbon to shape it into a bubbly garland. That hung over the name banner that a friend made for us using her Cricut machine.  On the pink deco mesh we had each guest write a quote, advice, or memory and clip it or tie it to the mesh.  It made for a really sweet backdrop behind the chairs as Victoria opened her shower gifts.

For dessert we ordered mini cupcakes and cake balls in a variety of flavors.
We couldn't pick just one flavor, and figured for a baby girl shower the more sugary treats the better! They turned out beautifully!
 
 
And for the final detail, the name banner made from the Cricut.....
The name for the sweet baby girl, Tori Elizabeth! 
 
Posted by Picasa

Friday, July 27, 2012

It's all in the details


One of my good friends requested a post dedicated to the party details. So here it is! I had so much fun planning Devyn's birthday party last week! It was a princess flamingo theme. I was originally going to go with Alice in Wonderland, but decided all the precious Pinterest tea-party  birthday ideas had to be saved for when she's older. (Gives me time to collect vintage teapots!)

 I started about 6 weeks out keeping my eye on Pinterest, craft stores, Target (of course!) and party stores.  I previously posted about the feather boa birthday wreath, so if you want to check out the DIY tutorial, click here!

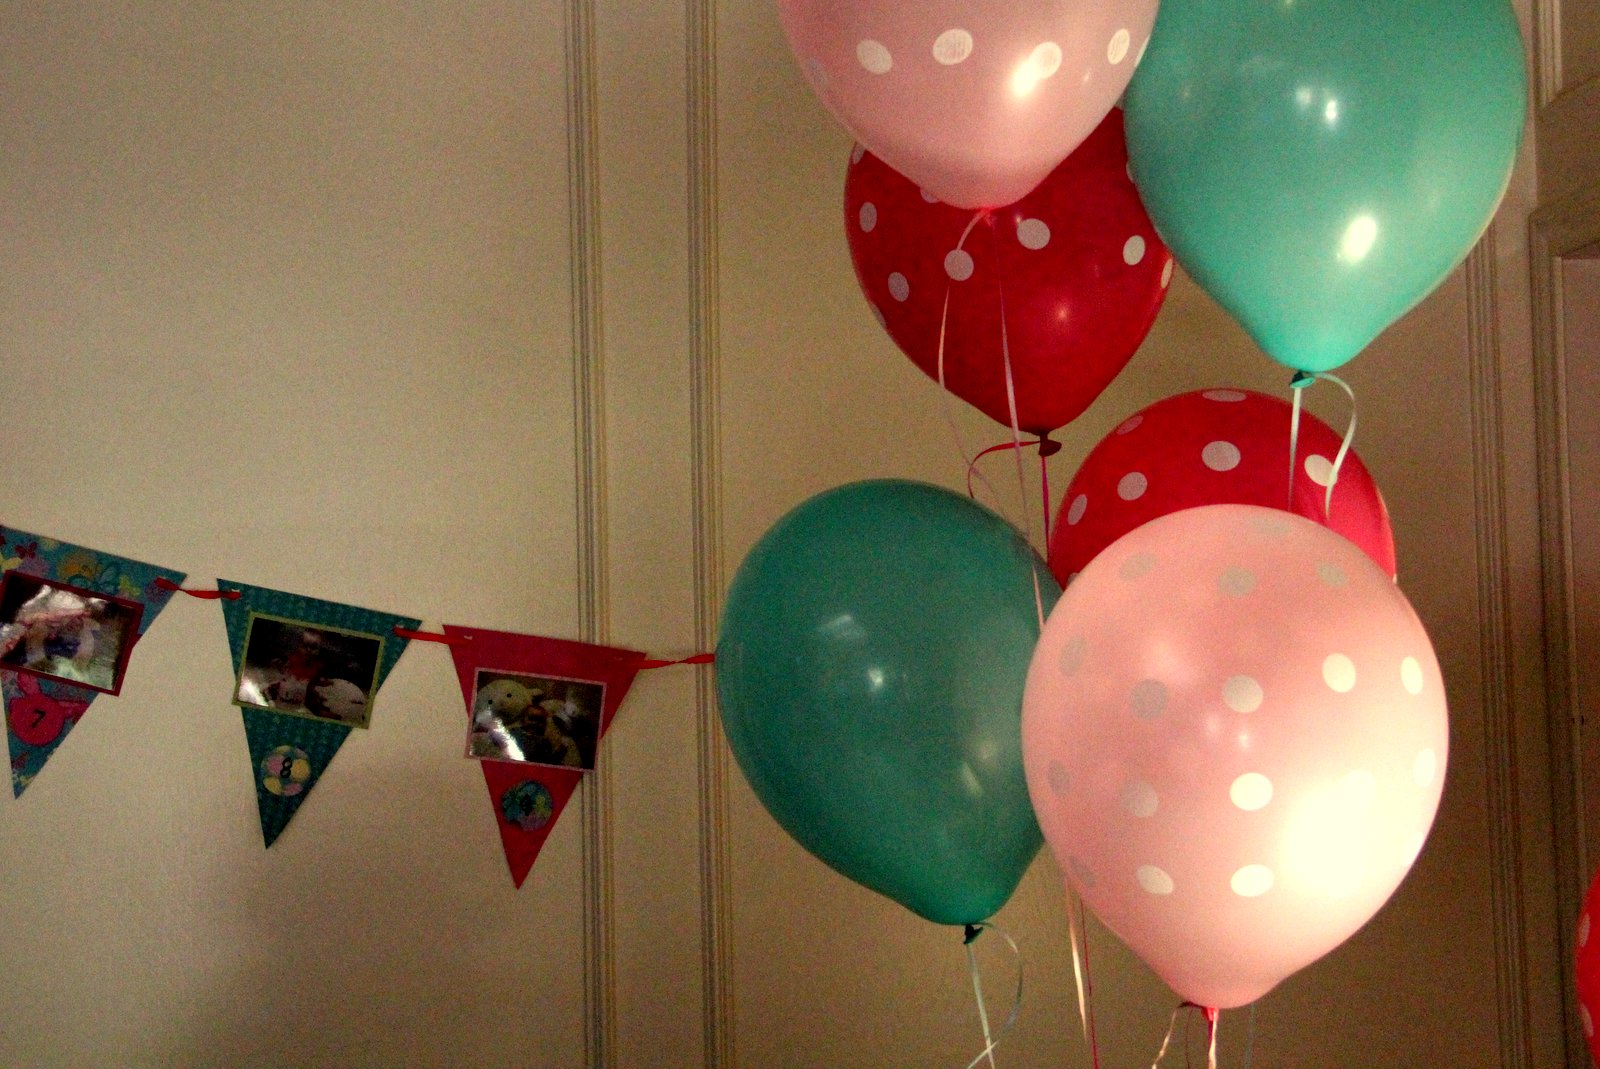
I came across the pink polka dot balloons at Party City. They were sold in a pack of 20. I grabbed some of the teal (or Tiffany blue, whatevs!) balloons at the balloon counter. In the background, you can see the birthday bunting I made. I collected pics from Devyn's first year from 0 months to 12 months that I took on the lambie play mat. Each month I took a picture of her with a paper birthday cake that said how many months old she is. I opted to go with the prop instead of the onesie sticker shirts because I wanted a collection of photos in my favorite of her outfits from the first year. I glued them to bright pink, light pink, teal, and lime green scrapbook paper border and used double stick tape to affix them to the bunting triangles. I also numbered each triangle and hung them in order so guests could see her grow. It was my favorite decoration, and definitely the most time-consuming to make!

We served Devyn's favorite foods. Chick-Fil-A chicken nuggets (with Polynesian sauce for Mommy!), fruit salad, a veggie tray (with strawberry shortbread thumbprint cookies), broccoli salad, pink cookies, mini chocolate cupcakes, and chicken salad. 

Her cake was white chocolate ganache with buttercream icing. Her cake sweated a little bit (come on, Adobe Photoshop Lightroom software, get here now!). We ordered it from Kroger, custom colors for her party. The design matched what we ordered for Cade's first birthday.  It's seriously one of the most delicious cakes I've ever had! And I loved that it looked like fondant but had that scrumptious buttercream taste!

I made tissue paper flower poms and hung them from our chandelier over the food table. Devyn loved them!
I did a birthday photo shoot at the park with Devyn. We used this photo on her invitation that my brother custom designed for us. We had a fancy flamingo princess themed party, so the gift baskets had a Grow-Your-Own-Flamingo egg (Dollar Tree), glow stick necklaces, shiny bead necklaces, and bubbles. All from the Dollar Tree and Albertson's.

I was so happy to come across the  yard flamingos in the Target Dollar Spot. I literally squealed and did a happy jump dance with my mom when I found them. I drew the flamingo my  brother created for the invite on pink posterboard and added glittery tiara, ring, and necklace accessories. I put one on the front door and another on the living room window above the kids' table.

I bagged popcorn favors for all the guests. Movie Theater Butter + Pink Vanilla = yumminess! Popcorn was from Pop It! in Plano.

Her bib is custom order from Etsy. Pink flamingos on Tiffany blue backing. The cupcake tiara is from Little Lam Boutique in Richardson.  Her smash cake is an oversized cupcake with custom icing to match her birthday cake, also from Kroger.
Devyn was right, it was too pretty to smash! The big kids at the party helped show her how to dig in!  More pics of the party itself to come.
Posted by Picasa

Saturday, July 21, 2012

DIY Feather Boa Wreath

 
Like all great ideas, I came across this one from Pinterest! I just had to make a fabulous birthday wreath, so I collected ideas on my "Let's Party, Y'all!" pinboard and decided on this wreath.

Estimated total cost $35. You definitely could do it for cheaper if you found the boas at an online wholesaler, or a drag queen's garage sale. Whatevs! I was in a crunch and had to get it done ASAP, so I didn't have that luxury. When you do hit up the craft store (I used Michaels and Hobby Lobby), do NOT go without your smart phone loaded with the Michaels app, and Hobby Lobby website with coupon pulled up. Both stores will scan the coupons from your phone.  Michaels take competitors' coupons, as does JoAnn Fabrics, Hobby Lobby does not. Definitely go prepared. The boas can make this project tres expensive if you're not prepared.

Materials: 
Foam pool noodle - Dollar Tree - $1
Duct tape or clear packing tape - about 2 feet worth
Grosgrain ribbon - to hang from door/wall - $1.99
Thinner grosgrain ribbon - to hang your letter initial - $0.50
Glitter paint
Wood letter - Hobby Lobby - $1.29
4 feather boas - Hobby Lobby - $8.99 each (but look for cheaper online!)
Floral pins - less than $2

First tape your pool noodle into a circular form. This is the base of your wreath!

Next tie your ribbon. Head to the spot where you'd like to hang your wreath and measure the distance you'd like it to hang. I did this about halfway through (pic below) so I could see how fluffy the wreath would be. I'm super visual, so this part helped me out.


You can hold your wreath as you work or hang it, whichever works best for you. I did a little of both. Wrap your boas around and around the noodle. You can leave a little room between wraps or pack them tightly together. Mine are pretty tight. I started off looser, but it wasn't as lush a look as I wanted. About every 3 wraps or so I would use the floral pins to tack the boas onto my wreath form. I love not using hot glue! It was easier to work on this project in between juggling kids' needs and pick back up later without worrying about leaving a hot glue gun laying around. ALSO you can re-use the boas this way.


This is a pic of the pins I chose to use. They worked really well! My boas are super secure, but they were easy to reposition. For the wood letter I started off with Krylon glitter spray. I, apparently, am some sort of jackass because it globbed up on me. Try doing short bursts and shaking the can frequently to avoid globbing if you go this route! I happened to have a silver Sharpie paint pen, so I opted to paint pen the other side of my letter and use Tulip glitter paint on top once the paint pen dried. The effect was as disco-ball as I was hoping for! I used a sparkly translucent thin ribbon to tie my "D" to the larger teal ribbon loop I used as the hanger. 

The effect was super cute. I hung the wreath on my front door for my daughter's fancy flamingo first birthday party! I'm going to hang the wreath in her room post-party as decor. It might make it's way to my classroom if I can't resist stealing it from my little diva!  It's too fabulous not to show off!

Other options would be finding some jewel floral picks to stick in to add some bling.
I saw some other cute ideas on Pinterest. One lady had made her wreath from orange boas and added a giant black spider for Halloween. Another person had used white boas and glittery snowflakes for the holidays. I came across boas that were purple, yellow, and green feathers and thought it would be a super-fun Mardi Gras wreath for you Louisiana fans!  It would be a cute springy wreath with little Easter bunnies and glittery foam eggs.  Seriously, I think there is at least one more feather boa wreath in my future.
Posted by Picasa

Sunday, October 30, 2011

Getting all "Pinterest" up in here!

 
My fave hobby of the year has been the discovery of Pinterest.com and working on my online bulletin board "collages".  It definitely has lit the DIY spark in me for everything from holiday decor to trying new recipes to sewing Halloween costumes and planning parties for the kiddies.

Special shout out to the Martha Stewart collection at JoAnn fabric for helping me achieve the DIY-look I was craving, haha! *cheater* So I'll also share where I found my finds, like a good little blogger.

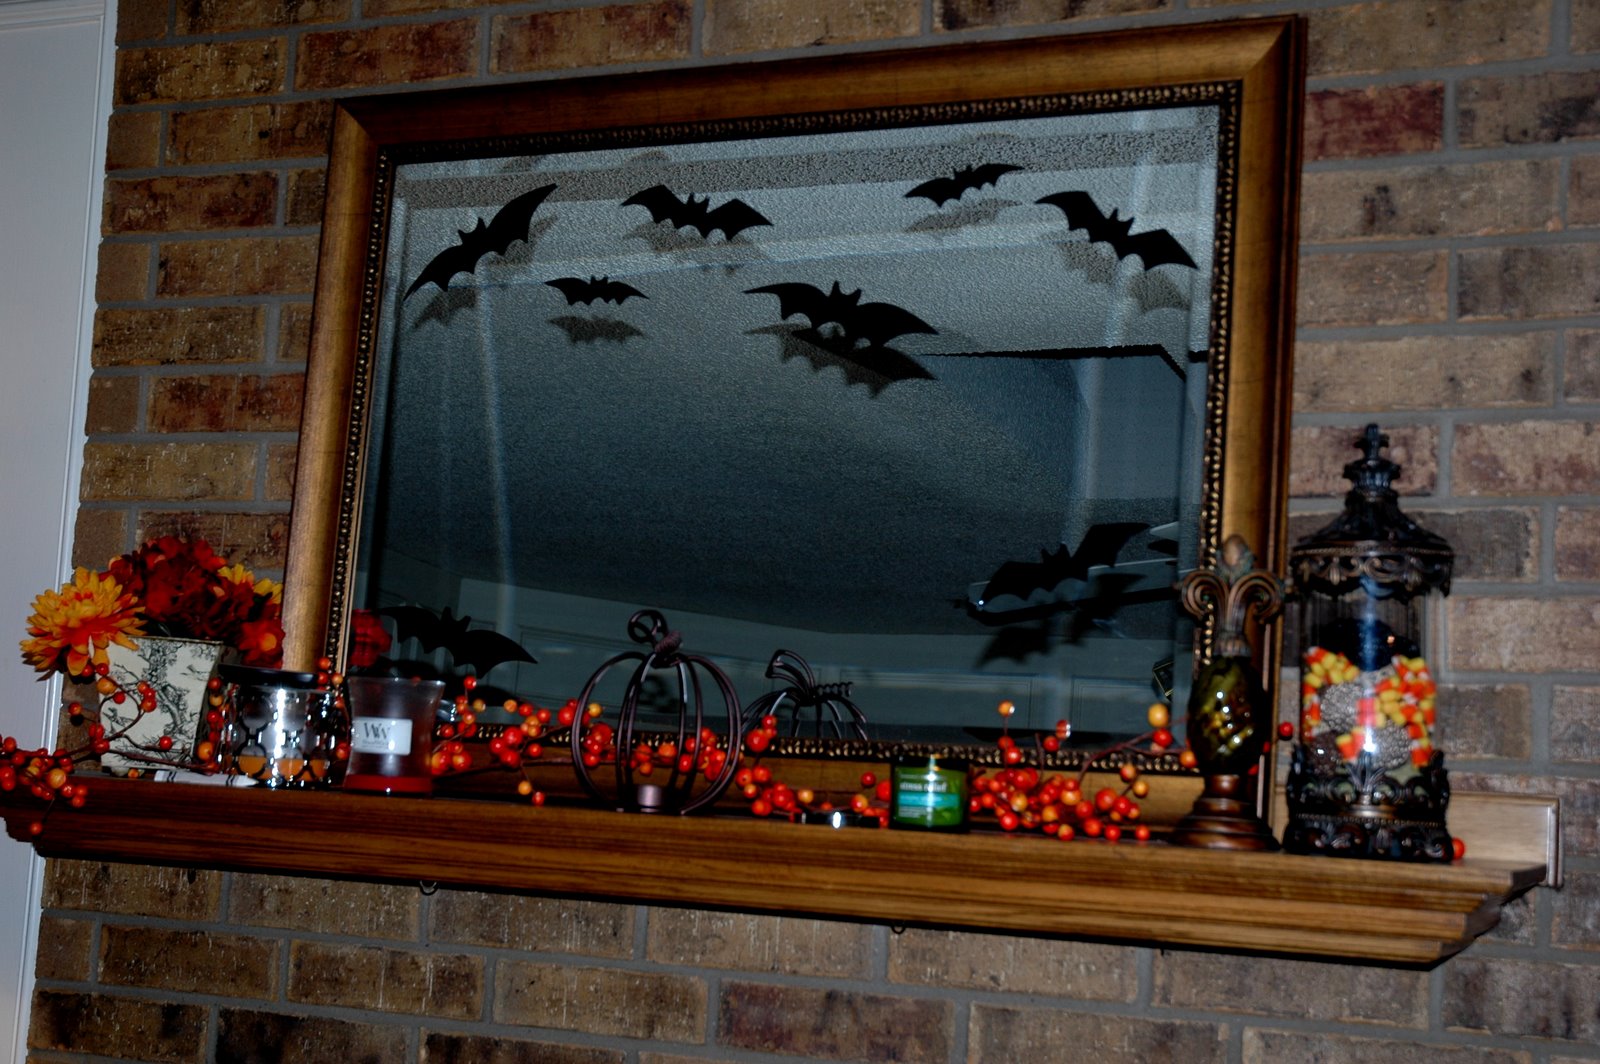
Mantle decor
Fall berry garland: Paul Michaels in Canton, Texas, $10ish last year
Wire pumpkin candle holder: Gift, Kohl's
Quatrefoil candle holder with mango candle: Bath and body works
Toile planter and faux flowers: Michaels, last year
Fleur-de-lis knick knack, part of a set gifted to us, Kirklands
Hurricane: Hobby Lobby, filled with decorative balls from Pier One, and Candy Corn

Mini pumpkins: $3 each, Target
Mickey Jackolantern: gift from Lolli, Walgreens
Green glitter skull: $1, Target Dollar Spot
Scarecrow crunch: Quaker Oats cereal, mini pretzels, raisins, candy corn, Reese's pieces, and orange flavored popcorn (from Pop It!)

Fruit kabobs: strawberries, cantaloupe, honeydew melon, grapes
Cheese & Ritz kabobs: pre-cut mini cheese "sandwiching" a Ritz
Skeleton & Pumpkin picks: Martha Stewart collection, JoAnn Fabric (super sale with coupon)


Pin the nose on the witch was a HUGE hit. Note to self -- next party, make 30 noses instead of 8. The kids had a total blast spinning in a circle three times then pinning the nose on the witch. Each kid's pin got major giggles. (Speaking of pins, I suggest you "pin" these fun ideas to your Pinterest boards! hehe)
 Green and black posterboard, Dollar Tree ($0.50 each)
Black & red marker: in my craft closet
Crayola mini's glitter : in my craft closet
Noses: Fun foam, Dollar Tree, $1 for a pack of 12 sheets
Masking Tape: in my junk drawer
Posted by Picasa

Wednesday, July 22, 2009

Can I get a what what!


Rockin' his stars, little rockstar!
I used clear backed scrapbooking stickers...never a fan of commitment, I know...
but it gives me flexibility to coordinate with his outfits.


Success!!! First time in the Bumbo today, all by himself! Could I be any prouder?
Why yes, yes I can be prouder... I was filling out his baby milestones calendar, supervising some tummy time whilst on the phone with a friend...and little man has pushed/crawled himself off of his lambie playmat. Fantastic developments today, buddy!


Related Posts Plugin for WordPress, Blogger...